Welcome!
![]()
![]()
Projects and articles found here!
Overview
diode - modifying a £10 switch to act as a firmware data diode

diode 2 - implementing the NCSC safely importing data pattern

autospy - a test spy object library for Rust
#![allow(unused)]
fn main() {
#[cfg_attr(test, autospy::autospy)]
trait MyTrait {
    fn foo(&self, x: u32) -> bool;
}

fn use_trait(trait_object: &impl MyTrait) -> bool {
    trait_object.foo(10)
}

#[cfg(test)]
mod tests {
    use super::*;

    #[test]
    fn test_trait() {
        let spy = MyTraitSpy::default(); // build spy

        spy.foo.returns.set([true]); // set the return values

        assert!(use_trait(&spy)); // use the spy
        assert_eq!([10], spy.foo.arguments) // check the captured arguments
    }
}
}
licenses - cargo subcommand for collecting, summarising and checking licenses
$ cargo licenses --help
Usage: cargo licenses [OPTIONS] <COMMAND>

Commands:
  collect  Collects all licenses into a folder
  summary  Provides a summary of all licenses
  check    Checks all licenses for inconsistencies
  diff     Diff between the current licenses folder and the licenses that would be collected

Options:
  -d, --dev                  Include dev dependencies [default: excluded]
  -b, --build                Include build dependencies [default: excluded]
  -D, --depth <DEPTH>        The depth of dependencies to include [default: all sub dependencies]
  -e, --exclude <WORKSPACE>  Exclude specified workspace [default: all included]
  -i, --ignore <CRATE>       Ignore specified crate [default: all included]
  -c, --config <PATH>        Path to configuration file
  -h, --help                 Print help
w5500-evb-pico-json - protocol break relay for valid JSON on the W5500-EVB-Pico
trust-list - command line tool for generating a markdown dependency information table
| name | downloads | contributors | reverse_dependencies | versions | created_at | updated_at | repository |
|---|---|---|---|---|---|---|---|
| anyhow | 455074655 | 24 | 24558 | 102 | 05/10/2019 | 19/09/2025 | https://github.com/dtolnay/anyhow |
| chrono | 393631079 | 30+ | 17491 | 92 | 20/11/2014 | 08/09/2025 | https://github.com/chronotope/chrono |
| clap | 564552921 | 30+ | 25926 | 444 | 01/03/2015 | 29/10/2025 | https://github.com/clap-rs/clap |
| field_names | 556548 | 1 | 3 | 3 | 08/01/2021 | 04/01/2022 | https://github.com/TedDriggs/field_names |
| itertools | 701399480 | 30+ | 7038 | 130 | 21/11/2014 | 31/12/2024 | https://github.com/rust-itertools/itertools |
| pbr | 2835208 | 26 | 105 | 24 | 14/10/2015 | 08/02/2023 | https://github.com/a8m/pb |
| reqwest | 307663439 | 30+ | 14612 | 115 | 16/10/2016 | 13/10/2025 | https://github.com/seanmonstar/reqwest |
| serde | 701667189 | 30+ | 59544 | 315 | 05/12/2014 | 27/09/2025 | https://github.com/serde-rs/serde |
| serde_json | 616227930 | 30+ | 41960 | 177 | 07/08/2015 | 14/09/2025 | https://github.com/serde-rs/json |
redacta - command line tool for redacting information from text
$ echo "Look at my 192.168.0.1 IP!" | redacta --ipv4
Look at my *********** IP!
autospy
🎵 autospy record, autospy replace 🎵


A test spy object library.
Overview
A test spy is a type of test double used in unit testing. It provides the same interface as the production code, but allows you to set outputs before use in a test and to verify input parameters after the spy has been used.
#[autospy] generates a test spy object for traits.
Usage
The example below demonstrates use in a unit test assuming autospy is included in [dev-dependencies].
#![allow(unused)]
fn main() {
#[cfg_attr(test, autospy::autospy)]
trait MyTrait {
    fn foo(&self, x: u32) -> bool;
}

fn use_trait(trait_object: &impl MyTrait) -> bool {
    trait_object.foo(10)
}

#[cfg(test)]
mod tests {
    use super::*;

    #[test]
    fn test_trait() {
        let spy = MyTraitSpy::default(); // build spy

        spy.foo.returns.set([true]); // set the return values

        assert!(use_trait(&spy)); // use the spy
        assert_eq!([10], spy.foo.arguments) // check the captured arguments
    }
}
}
For additional examples and features see the docs.
Acknowledgements
Autospy is heavily influenced by the excellent mockall crate, which, through automock, provides many similar features.
Autospy aims to offer these features through a macro-generated spy object, rather than a mock object. The use of either is largely personal preference; however, there are some advantages to using a spy object:
| Test object | Test failures | Test structure | Complexity |
|---|---|---|---|
| Mock | Panics if expectations fail; error messages can be unclear | Less standard pattern, expectations are baked into object | More crate-specific syntax and usage patterns |
| Spy | Asserts like any regular test | Assert after use, more standard test pattern | Simple: set what's returned, then inspect what was called |
licenses


Cargo subcommand for collecting licenses.
Install
$ cargo install licenses
Usage
$ cargo licenses --help
Usage: cargo licenses [OPTIONS] <COMMAND>

Commands:
  collect  Collects all licenses into a folder
  summary  Provides a summary of all licenses
  check    Checks all licenses for inconsistencies
  diff     Diff between the current licenses folder and the licenses that would be collected

Options:
  -d, --dev                  Include dev dependencies [default: excluded]
  -b, --build                Include build dependencies [default: excluded]
  -D, --depth <DEPTH>        The depth of dependencies to include [default: all sub dependencies]
  -e, --exclude <WORKSPACE>  Exclude specified workspace [default: all included]
  -i, --ignore <CRATE>       Ignore specified crate [default: all included]
  -c, --config <PATH>        Path to configuration file
  -h, --help                 Print help
Commands
Collect
Collects all licenses into a folder.
The output folder path can be specified with --path, defaults to licenses.
Prints a warning:
- If the crate had no declared license on crates.io (none declared)
- If no licenses were found for a crate (empty)
- If there were fewer licenses found for a crate than declared by the author on crates.io (too few)
- If there were more licenses found for a crate than declared by the author on crates.io (additional)
- If the content of the found licenses did not match the expected content for those licenses (mismatch)
$ cargo licenses collect --depth 1
licenses
├── anyhow-LICENSE-APACHE
├── anyhow-LICENSE-MIT
├── cargo_metadata-LICENSE-MIT
├── clap-LICENSE-APACHE
├── clap-LICENSE-MIT
├── colored-LICENSE
├── indicatif-LICENSE
├── itertools-LICENSE-APACHE
├── itertools-LICENSE-MIT
├── serde-LICENSE-APACHE
├── serde-LICENSE-MIT
├── serde_json-LICENSE-APACHE
├── serde_json-LICENSE-MIT
├── spdx-LICENSE-APACHE
├── spdx-LICENSE-MIT
├── strsim-LICENSE
├── toml-LICENSE-APACHE
└── toml-LICENSE-MIT
Summary
Summarises the declared licenses.
The declared license is what the author declares the license as on crates.io, it is not necessarily the same
as the actual licenses. The warnings generated by the collect and check commands will highlight discrepancies between the
declared licenses and the actual licenses.
The summary can be formatted as JSON or TOML with --json or --toml respectively.
$ cargo licenses summary --depth 1
MIT - cargo_metadata,indicatif,strsim
MIT OR Apache-2.0 - anyhow,clap,itertools,serde,serde_json,spdx,toml
MPL-2.0 - colored
Check
Checks all licenses for inconsistencies.
Returns a non-zero exit code:
- If the crate had no declared license on crates.io (none declared)
- If no licenses were found for a crate (empty)
- If there were fewer licenses found for a crate than declared by the author on crates.io (too few)
- If there were more licenses found for a crate than declared by the author on crates.io (additional)
- If the content of the found licenses did not match the expected content for those licenses (mismatch)
$ cargo licenses check
warning: additional - found all declared licenses, but found additional licenses for:
        memchr - COPYING
        unicode_xid - COPYRIGHT
        utf8_iter - COPYRIGHT
warning: mismatch - found license(s) whose content was not similar to declared licenses for:
        portable_atomic - LICENSE-APACHE
Diff
Compares the current collected licenses folder against the licenses that would be collected.
Current licenses folder path can be specified with --path, defaults to licenses.
Returns a non-zero exit code if there is a difference between the licenses that would be collected and the current collected licenses folder.
$ cargo licenses diff
Configuration
A TOML configuration file can be used to store all passed flags, as well as enabling options on a per-crate basis. If both a config and a flag set the same option, the flag will take precedence.
$ cargo licenses <COMMAND> --config licenses.toml
Skipping licenses
The configuration file allows the selective skipping of licenses found by the various subcommands. It is recommended to provide a comment per skipped license to indicate why it is deemed okay to skip, for instance it might be erroneously detected as a license because of the filename.
[crates]
example_crate = { skip = ["FILE"] } # comment on why the files are skipped
Allowing warnings
Warnings generated by the collect or check command can be allowed in the configuration file, this allows erroneous
warnings to be selectively silenced. It is recommended to provide a comment on why a warning is being allowed. The warnings
that can be allowed are included in the warning message, these are:
too fewemptynone declared{ additional = ["file1", "file2"] }{ mismatch = ["file1", "file2"] }
[crates]
example_crate = { allow = "too few" }
Include licenses
Additional licenses can be included for a specific crate via the configuration file.
[crates]
example_crate = { include = [{ name = "LICENSE", text = "custom license text" }] }
Example
The below is an example of a TOML configuration file that could be used via the --config flag.
[global]
dev = true
build = true
depth = 1
exclude = ["workspace"]
ignore = ["crate"]

[crates]
crate_one = { skip = ["COPYING"] } # not a license, statement of which licenses the crate falls under
crate_two = { allow = { mismatch = ["LICENSE"] } } # erroneous license content mismatch
crate_three = { allow = "too few" } # only one license provided
Usage patterns
This tool is designed to help collect required licenses when shipping software with open-source dependencies. The intended pattern of use would look as follows:
summaryprovides a quick way to see if any dependencies are using stricter licenses that might not be suitable, copy-left for instancecollectto collect all licenses into an output folder, this would be done manually and the license folder commited as part of the repository- the previous command might have raised warnings about licenses found, or not found, these can be manually assessed then skipped or allowed in the configuration file
- as part of a continuous integration system, or as a pre-commit hook, a
diffshould be run to check the licenses folder hasn't missed any licenses added by new dependencies or removed by removing dependencies - as part of a continuous integration system a
checkshould be run to confirm all license inconsistencies have been handled in the configuration
Legal disclaimer
This is provided as a convenience to help with collecting and reviewing open-source licenses. It does not guarantee compliance with all legal licensing requirements. It is the user's responsibility to ensure that all applicable licenses are collected, reviewed and adhered to. The authors and contributors of this tool accept no liability for missing, incomplete or inaccurate licenses files, or for any consequences arising from its use.
w5500-evb-pico-json

Protocol break relay for valid JSON on the W5500-EVB-Pico.
Overview
Uses the WIZnet W5500 on the W5500-EVB-Pico in MACRAW mode to pass raw packets to the RP2040. A protocol break is implemented by throwing away the protocol information of received packets, then the payload is validated as JSON, and finally a new packet is constructed to forward the contents on.
Dependencies
You will need a debug probe that supports the Serial Wire Debug (SWD) protocol.
trust-list


Command line tool for generating a dependency information table in markdown.
Install
cargo install trust-list
Usage
$ trust-list --help
Command line tool for generating a dependency information table in markdown

Usage: trust-list [OPTIONS]

Options:
  -o, --output-file <OUTPUT_FILE>  The output filename, appended with .md [default: trust-list]
  -r, --recreate                   Recreate table [default: appends new dependencies]
  -D, --depth <DEPTH>              The depth of dependencies to collect information on [default: all sub dependencies]
  -d, --dev                        Include dev dependencies [default: excluded]
  -b, --build                      Include build dependencies [default: excluded]
  -e, --exclude <EXCLUDE>          Exclude specified workspace [default: all included]
  -h, --help                       Print help
  -V, --version                    Print version
Example
trust-list --depth 1
| name | downloads | contributors | reverse_dependencies | versions | created_at | updated_at | repository |
|---|---|---|---|---|---|---|---|
| anyhow | 455074655 | 24 | 24558 | 102 | 05/10/2019 | 19/09/2025 | https://github.com/dtolnay/anyhow |
| chrono | 393631079 | 30+ | 17491 | 92 | 20/11/2014 | 08/09/2025 | https://github.com/chronotope/chrono |
| clap | 564552921 | 30+ | 25926 | 444 | 01/03/2015 | 29/10/2025 | https://github.com/clap-rs/clap |
| field_names | 556548 | 1 | 3 | 3 | 08/01/2021 | 04/01/2022 | https://github.com/TedDriggs/field_names |
| itertools | 701399480 | 30+ | 7038 | 130 | 21/11/2014 | 31/12/2024 | https://github.com/rust-itertools/itertools |
| pbr | 2835208 | 26 | 105 | 24 | 14/10/2015 | 08/02/2023 | https://github.com/a8m/pb |
| reqwest | 307663439 | 30+ | 14612 | 115 | 16/10/2016 | 13/10/2025 | https://github.com/seanmonstar/reqwest |
| serde | 701667189 | 30+ | 59544 | 315 | 05/12/2014 | 27/09/2025 | https://github.com/serde-rs/serde |
| serde_json | 616227930 | 30+ | 41960 | 177 | 07/08/2015 | 14/09/2025 | https://github.com/serde-rs/json |
Compliance
Restricted to one request per second as per crates.io data access policy.
redacta


Command line tool for redacting information from text.
[!WARNING] This is an early stage implementation, it might not redact accurately.
Install
curl -sS https://raw.githubusercontent.com/lhalf/redacta/main/install.sh | sh
Or install via cargo:
cargo install redacta
Usage
Takes text via stdin and forwards redacted text to stdout.
$ redacta --help
Usage: <STDIN> | redacta [OPTIONS]

Options:
      --ipv4           Enable IPv4 redaction
      --ipv6           Enable IPv6 redaction
      --fqdn           Enable FQDN redaction
  -r, --regex <REGEX>  Regex redaction
  -h, --help           Print help
Example
$ echo "Look at my 192.168.0.1 IP!" | redacta --ipv4
Look at my *********** IP!
$ echo "No really, look at my 2001:db8:3333:4444:5555:6666:7777:8888 IP!" | redacta --ipv6
No really, look at my ************************************** IP!
$ echo "Okay, it is example.server.com here..." | redacta --fqdn
Okay, it is ****************** here...
Making a firmware data diode from a £10 network switch
What is a data diode?
A cybersecurity device designed to only allow data flow in one direction.

Sadly, Simon Cowell has no idea what a data diode is, as they are designed for high-security environments such as:
- Defence
- Critical National Infrastructure
- Financial Services
- Energy & Utilities
And are a major component in X domain solutions, not The X Factor...

Get on with it...
Why are they useful?
Data diodes are useful for bridging air-gapped networks where you might not want a network to send traffic back to the other. The green is traffic you want to get out of the network, the red is traffic you don't want to let back in!

They are a key component in cross-domain solutions. The goal of this article is not to explain in detail the use cases of data diodes, but rather to explore the title.
Types of data diode
The behaviour of a data diode can be achieved in a variety of ways.
Hardware defined
The purest form of data diode. A piece of physical hardware that enforces uni-directional data flow, it is physically impossible for data to travel in the reverse direction.
Software defined
Software that provides uni-directional network behaviour. There is no physical hardware enforcing this behaviour, so in theory if the software is vulnerable so is the uni-directional behaviour.
Firmware defined
Uni-directional network behaviour enforced through firmware running directly on hardware; again, there is no physical hardware enforcing uni-directional behaviour. In theory, this is more secure than a software defined data diode as you often require physical access to the hardware to modify the firmware. There is also typically a reduced attack surface against firmware as it has fewer responsibilities and therefore fewer exploitable interfaces than software running on general purpose hardware.
Why aren't they used elsewhere?
Great question, and the answer should be there is no reason.
In practise there are a few barriers to entry that prevent widespread adoption of this technology:
- They are more expensive than software-based solutions, such as firewalls
- They are more complicated to integrate into certain networks
How much do they typically cost?
A quick Google search suggests the average cost of a data diode ranges from "a few thousand to tens of thousands of dollars, depending on several factors".
This cost is a high barrier to entry for most users and often doesn't justify the additional security offered over a traditional firewall.
Why are they expensive?
Hardware defined data diodes are expensive because they require custom hardware. They are the only option providing hardware guarantees on uni-directional behaviour, and are therefore favoured for high-security environments where the highest security is financial justifiable.
Can they be made cheaper?
Yes - well maybe.
Hardware defined diodes will always be the preferred choice in high-security environments, because they provide the strongest guarantees. They will likely continue to command a high price due to custom hardware, supporting the teams of experts required to design and manufacture them as well as R&D costs.
Software defined diodes are free in theory, with a solid understanding of computer networking and some coding skills (or prompting skills) you could whip up something that acts like a data diode. There are a few benefits to this approach, notably the flexibility in features and deployment. The downside being your uni-directional behaviour is only as secure as your software, which is often not very!
Firmware defined diodes, in my opinion, offer a middle ground between hardware guarantees, cost and flexibility. They do not offer hardware uni-directional guarantees; however, they do offer a significantly reduced attack surface versus software defined diodes. As this article will explore, they can also be made from cheap commodity hardware.
So, what how can we make a firmware defined data diode for £10?
The approach
There are many affordable unmanaged network switches on the market, retailing for as low as £5. These devices often contain mature and flexible switch controller chips, which have a number of configuration options for different applications. As these switches are unmanaged, these configuration options cannot be accessed remotely via a management interface - they are "plug and play". The configuration options are read from an EEPROM chip when the device is powered on, and never again after. If we want to modify the configuration options on these unmanaged switches, we need to modify the contents of the EEPROM chip read when power is applied.
What settings could we modify to achieve uni-directional transfer?
There is a number of configuration options that we could use to provide uni-directional behaviour:
| Configuration option | Does what? | So what? |
|---|---|---|
| VLAN | Enables 802.1Q port-based VLAN tagging | We could prevent traffic tagged with a VID from one port reaching another in a different VLAN |
| Port mirroring | Mirrors the received packets from the one port to another | We could copy each packet arriving at the ingress port to the egress port |
| Port isolation | Provides a port isolation mask for a given port | We could allow traffic from the ingress port to reach the egress, and drop all traffic reaching the egress port |
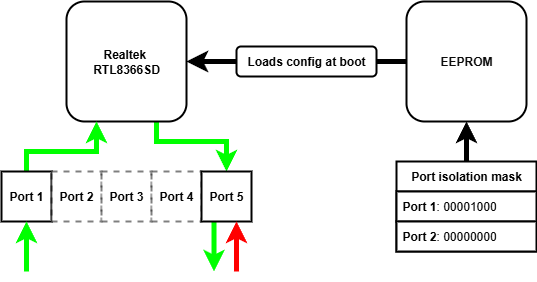
Using the VLAN alone, we cannot achieve the behaviour required - the ingress port is on a different VLAN from the egress port, so ingress traffic cannot reach the egress port. We can achieve uni-directionality by combining the VLAN and port mirroring approach, traffic arrives at the ingress port and is tagged with the ingress PVID. The traffic cannot reach any other port because they are all on different VLANs. With port mirroring enabled, these packets are mirrored to the egress port and on to their destination. Any reverse traffic again is tagged by the egress PVID, but still cannot reach any other port so is dropped. There is no mirroring from egress to ingress port.
Port isolation can be used in isolation of VLAN and port mirroring configuration to achieve uni-directionality. We simply configure the port isolation mask for the ingress port to include the egress port, allowing traffic to reach the egress port. We then configure the egress port isolation mask to nothing, meaning any traffic arriving at the egress port cannot reach any other port.
We can combine all of these configuration options to minimise the risk one option has a vulnerability. All together:
| Configuration | Reason |
|---|---|
| Enable port-based VLAN tagging | Traffic is tagged with the PVID it arrives at, preventing traffic reaching another port |
| Enable dropping VLAN tagged packets | We don't want people to send us traffic they have tagged with a VID |
| Enable mirroring RX traffic | We want to copy received traffic to the egress port |
| Disable mirroring TX traffic | We don't want to copy transmitted traffic to the egress port |
| Disable mirroring RX pause frames | We don't want to copy these frames to the egress port |
| Enable port isolation for all other ports on the ingress port | We want all traffic to be dropped at the ingress port, as the RX traffic will be mirrored to the egress |
| Enable port isolation for all other ports on the egress port | We want all traffic to be dropped at the egress port |
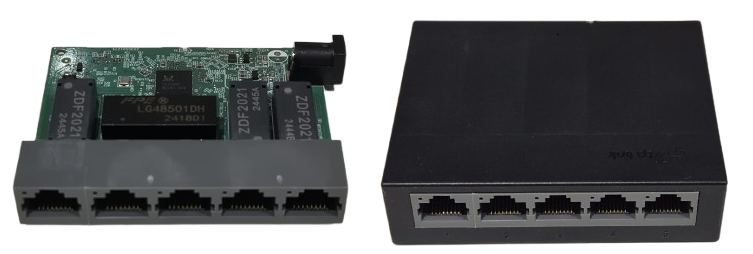
The hardware
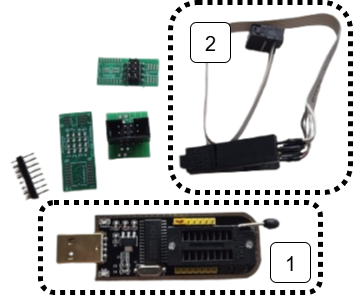
I used a TP-Link LS1005G, which I bought from Amazon for £10.
Opening up this switch we can see the various chips.
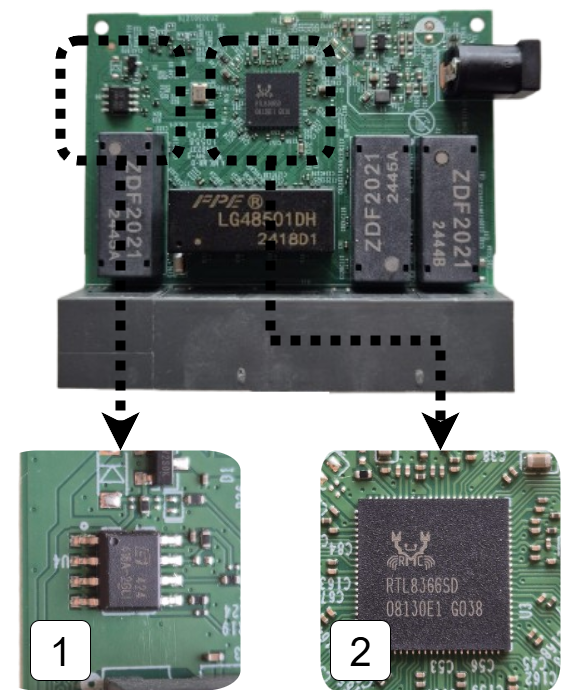
- 1 is the EEPROM chip that contains the configuration options for the switch
- 2 is the switch chip itself, this manages packet switching and will be enforcing our uni-directional behaviour
Flashing the EEPROM
As we explored in the approach we need to modify the configuration settings stored in the EEPROM chip in order to modify the switch behaviour. We can see how the data is loaded from EEPROM when the switch chip is powered up by perusing the datasheet.
The EEPROM interface of the RTL8366 and RTL8369 uses the serial bus EEPROM Serial Management Interface (SMI). The 2K-bit 24C02 EEPROM is read via the EEPROM SMI protocol. When the RTL8366/RTL8369 is powered up, the RTL8366/RTL8369 drives SCK and SDA to read the registers from the EEPROM.
The EEPROM chip is the same type commonly found on PC motherboards for holding the BIOS, which is convenient for us as there is lots of compatible clips for the purpose of flashing these chips. I used a CH341A programmer which came bundled with the correct clip for the EEPROM chip on the switch.
- 1 is the CH341A USB EEPROM programmer
- 2 is the clip attachment for the EEPROM chip
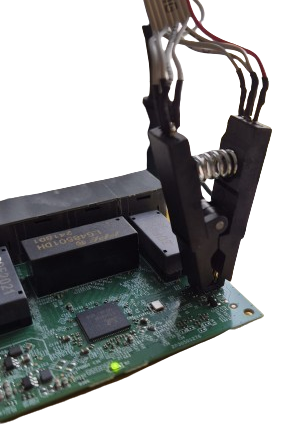
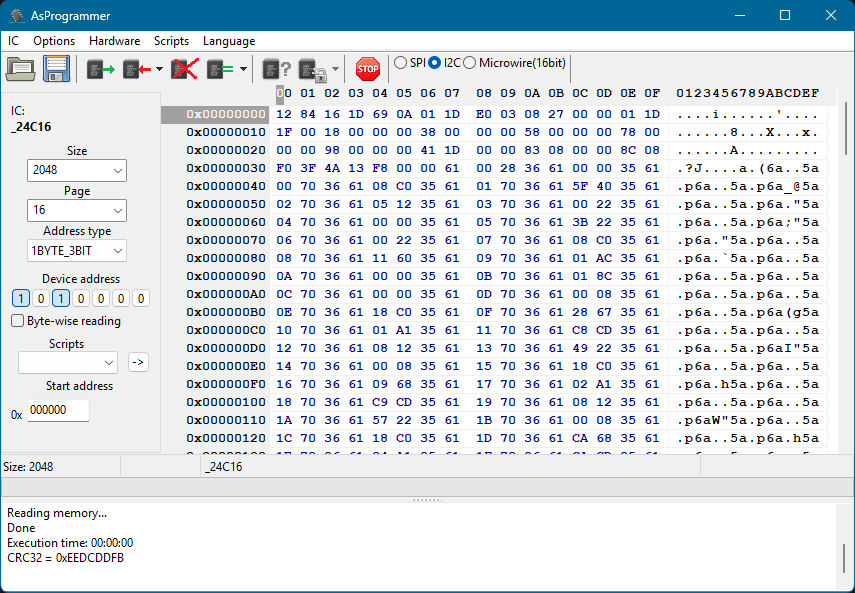
With the clip attached we can now read and program the EEPROM chip using tools such as AsProgrammer. These tools allow us to view the contents of the EEPROM as a hex dump. This isn't particularly useful unless we know how it is interpreted by the switch chip.
What is in the EEPROM?
Looking in the RTL8366 datasheet we can see how the contents of the EEPROM is interpreted by the switch chip.
- 1 the first two bytes are read, these determine when the switch chip will stop reading from EEPROM
- 2 everything else is 2 byte pairs of register location and register value
To set new behaviour on the switch chip we therefore need to modify the first two bytes to read further in EEPROM, then we can put our additional register settings in these newly read bytes.
Great! Now we just need to know which registers to set and what the values need to be.
What registers do we need to set?
To find the registers we need to set we can peruse the Realtek unmanaged switch library. This contains some very helpful resources when finding registers including:
- API documentation - details about the library's functions
- Programming guide - explains the design of the library and offers guidance on how to use it
And if you're feeling lucky, you might just search for the relevant register needed in the registers header file!
Once we've found the required register for the feature we're interested in, we need to know what to put there.
What do we need to put in the registers?
In the API documentation we find:
The forwarding port mask is configured per port. Every packet switched by switch can’t be forwarded to the ports which are not in the forwarding port mask.
CPU force TX (TX portmask in CPU tag) function doesn’t be affected by Port Isolation. Packets which coming from CPU port and have “TX portmask” in CPU tag can be forwarding to any other ports.
Besides this, Port Isolation is the highest priority in forwarding decision.
So we need to set a port isolation mask for two ports that we want to act as our date diode, let's use port 1 and port 5.
We can repeat the above steps to configure other settings on the switch chip, such as port-based VLAN tagging and port mirroring.
Once we know what registers we need to configure, the value we need in each register and therefore how many extra bytes into EEPROM we need to read we have everything to flash the chip with our new behaviour!
How can we check it worked?
Using it as intended of course! Let's send some UDP traffic through it, importantly we shouldn't be able to send TCP because it is bidirectional.
I will be testing the behaviour on Linux, which will require the following tools:
| Tool | For what? |
|---|---|
| netcat | reading and writing UDP |
| wireshark | analysing the packets being sent and received |
| ip | manually configuring ARP entries |
The first two tools appear obvious, but you might be asking what is an ARP entry and how does it need to be manually configured...
What is an ARP table and why do we need to manually configure entries?
The Address Resolution Protocol (ARP) pretty much does what it says on the tin, it resolves IP addresses to a MAC address within a network.
An ARP table is a cache that stores recent IP addresses mapped to MAC addresses. Each of these mappings is known as an ARP entry, for example an ARP entry might look like 192.168.1.10 → 00:1A:2B:3C:4D:5E.
Normally, ARP tables are populated automatically; however, this relies on a bidirectional exchange (sender broadcasts an ARP request, receiver replies with a MAC) - you might be seeing the problem already!
With a data diode in the way there is no way for the receiver to reply with its MAC address, meaning no automatically populated ARP entry!

We need to help out and manually give the ARP table entry relating to the device on the other end of the diode we want to send to. We can use the ip command on Linux to do exactly this!
sudo ip neighbour add <RECEIVING_IP> lladdr <RECEIVING_MAC> dev <NETWORK_ADAPTOR> nud permanent
Finally, we need to set static IPs on both network adaptors. The tool you use to do this is distro dependent.
The setup with static IPs looks as follows:

Once we have manually configured the ARP entry for the receiving device on the other end of the diode we can start sending and receiving UDP packets.
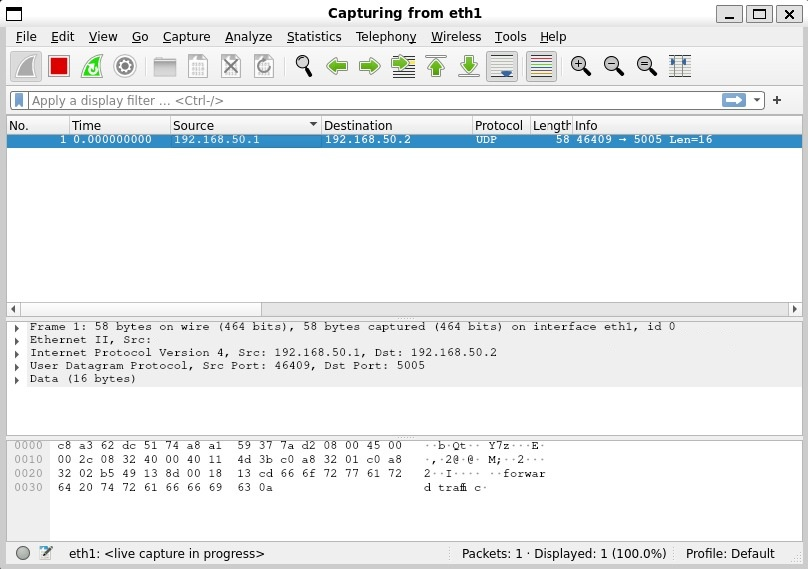
To start we need to start netcat listening on the receiving device, I'm using port 5005 for reasons.
nc --listen --udp 5005
Then we can start wireshark to capture packets arriving at the network adapter on the receiving device.
Now on the sending device we can start wireshark capturing packets being sent from the sending device.
Finally, we can send packets from the sending device using netcat!
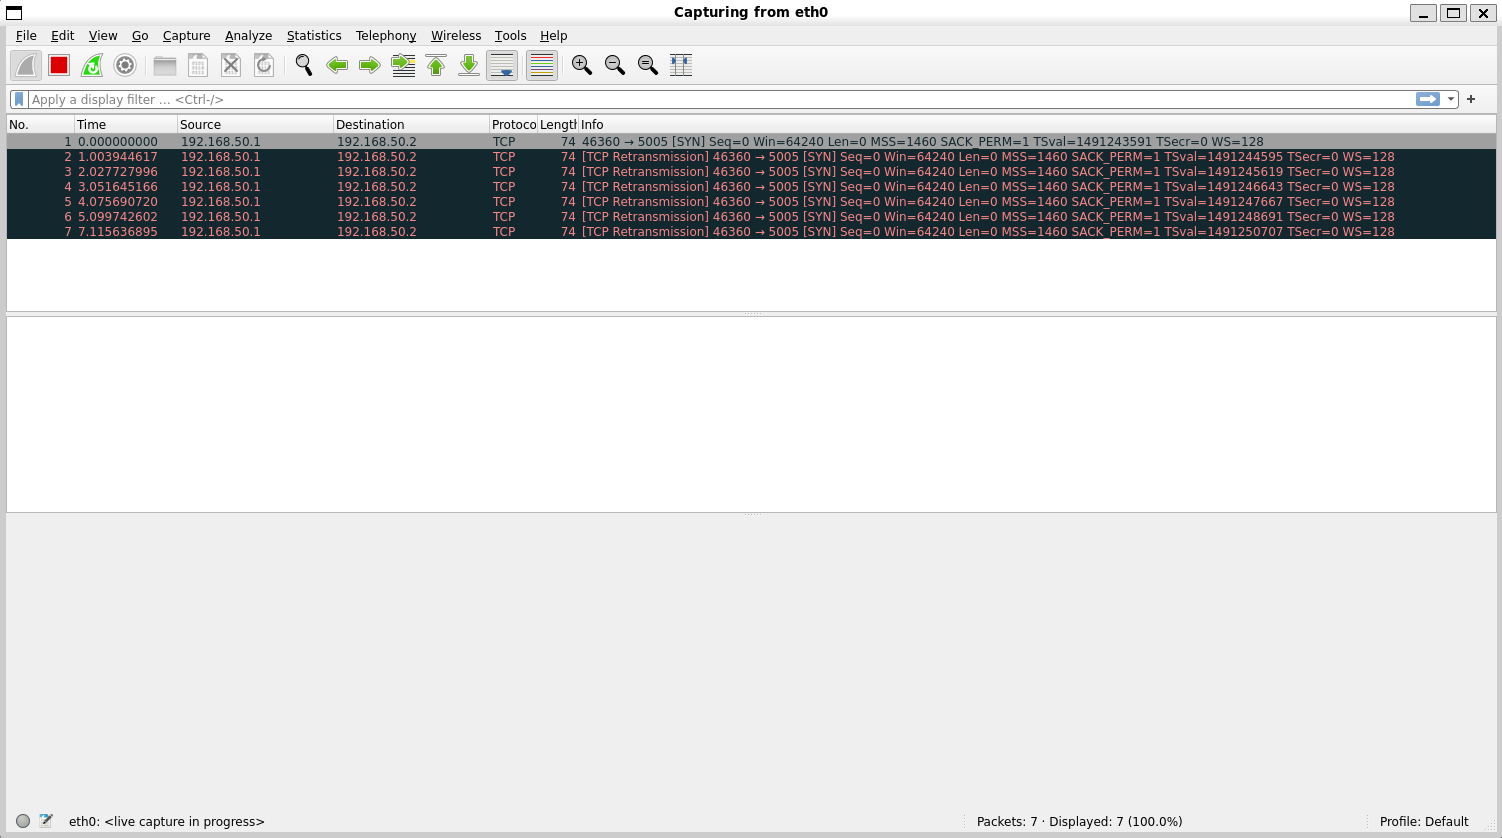
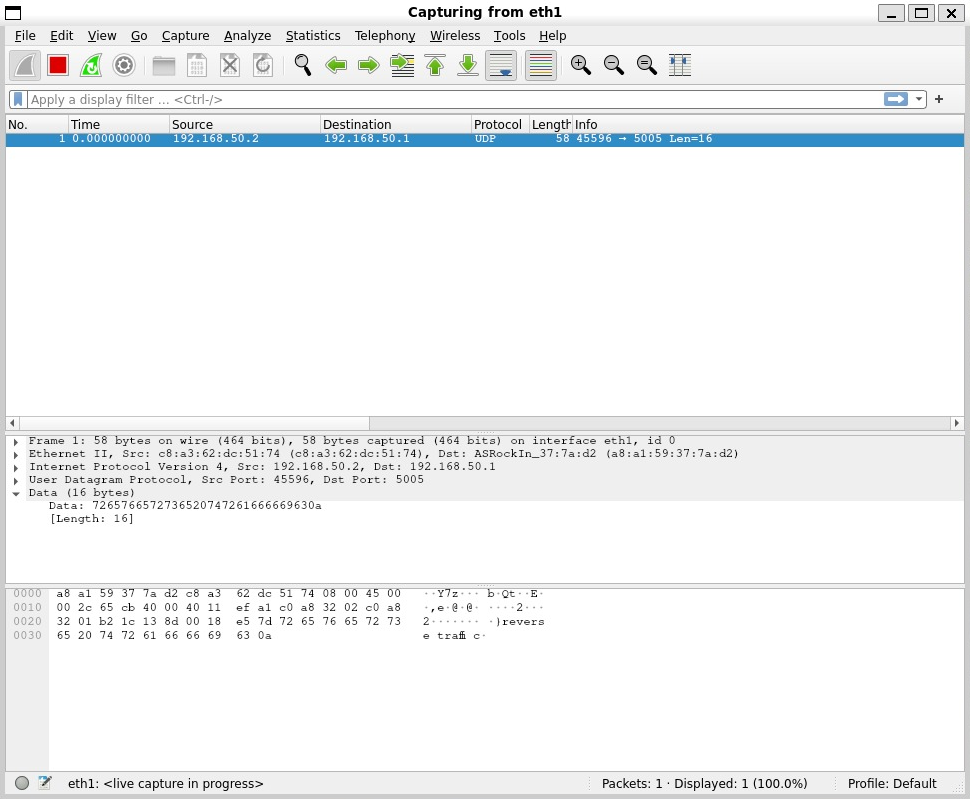
echo "forward traffic" | nc --udp 192.168.50.2 5005
On the sending machine we see packets go out...

On the receiving machine we see packets arrive!
Let's try the same test with TCP packets and see what happens...
We see a SYN packet go out, this is the initial handshake packet of the TCP protocol, but sadly his friends behind the data diode can't ACK back... in a desperate attempt to reach his unresponsive friends he tries to re-transmit the SYN packet many times to no avail, it's all a bit sad.
Maybe they can send something back over UDP, lets send some packets from the receiver...
echo "reverse traffic" | nc --udp 192.168.50.1 5005
On the receiver machine we can see packets go out...
And on the sender machine we see...
Nothing!
Conclusion
What I hope this article has demonstrated is that a modified unmanaged network switch can operate as a firmware defined data diode with a little bit of a tweaking.
Future work
There is a number of possibilities this initial work opens up, such as:
- Experimenting with other features on the switch chips
- Experimenting with more complex architectures to build towards cross domain solutions
- Experimenting with the 8 port variants
Acknowledgements
Thanks to Rene and the Open source data diode repository, where the original idea came from. I will be contributing the guide and registers for setting up a device for yourself!
Implementing NCSC import patterns on a budget
Recap
In my last article I wrote about making a firmware data diode from a £10 unmanaged network switch. The device itself works as a data diode, only allowing data through in one direction, which is great for certain situations such as:

Exporting data from a trusted network to an untrusted network through a data diode, assuming we don't mind the data we're exporting being out in the big bad world, eliminates the reverse path for anything malicious to go back into our trusted network. This example assumes the networks are otherwise air gapped.

What happens when we want to move data into our trusted network from the untrusted network? Well a data diode alone doesn't do much here, we still don't trust any data coming from the untrusted network. We have removed the possibility that should something malicious enter the network, at least it can't send anything, such as important data, back out the way it came in. That's not great, we can do better!
In this article we're going to look at how you might safely import a PDF file from the big bad world, into our lovely secure enclave.

But first you might have read the title and thought...
What is the NCSC?
The NCSC is the National Cyber Security Centre here in blighty. They produce guidance on how best to protect from all sorts of cyber threats, as well as providing reference architectures and patterns for building secure digital processes.

What is the Safely Importing Data Pattern?
The Safely Importing Data Pattern is an architecture provided by the NCSC on how to safely move data from an untrusted to a trusted network. As with all cybersecurity patterns it doesn't guarantee safety, it just makes it significantly harder for an adversary to exploit or attack it.

There's some funky new terms you might not have heard of in there, so lets break it down...
What is a transformation engine?
Something that transforms a file or content into another format, pretty simple? But why...
When dealing with complex data types, like a PDF for example, there are many nooks and crannies to hide malicious data in. This makes it more difficult to reliably check for malicious intent, if the data was in a simpler format it's much easier to check.
In our PDF example, we might not care about all the gubbins that can be expressed in the PDF format we might just want the text inside. So our transformation engine might simply take PDFs, and spit the text content out. As it happens there are a number of tools that can do exactly this, which we'll cover later.

What is a protocol break?
A protocol break means terminating a network connection and its associated network protocols and then rebuilding it and sending it on. But why...
It might seem redundant to terminate and reconstruct a connection and network protocols, but again it is about reducing the attack surface. Standard OS network stacks consist of vast amounts of code, parsing all sorts from ARP, ICMP, DHCP etc. The more complexity, the more places vulnerabilities can hide. By terminating and reconstructing connections we can throw away protocol headers that might look to exploit these vulnerabilities. If we're deliberate in extracting the payload, then pass it onwards with protocol headers that we control, we reduce the risk protocol-level exploits are propagated.

What is a verification engine?
Something that verifies data, but you might be wondering what do you mean verify data?
Syntactic verification
One type of data verification is called syntactic verification, which is about verifying the syntax of data. I find an example is the easiest way to explain this, let's take JSON as an example:
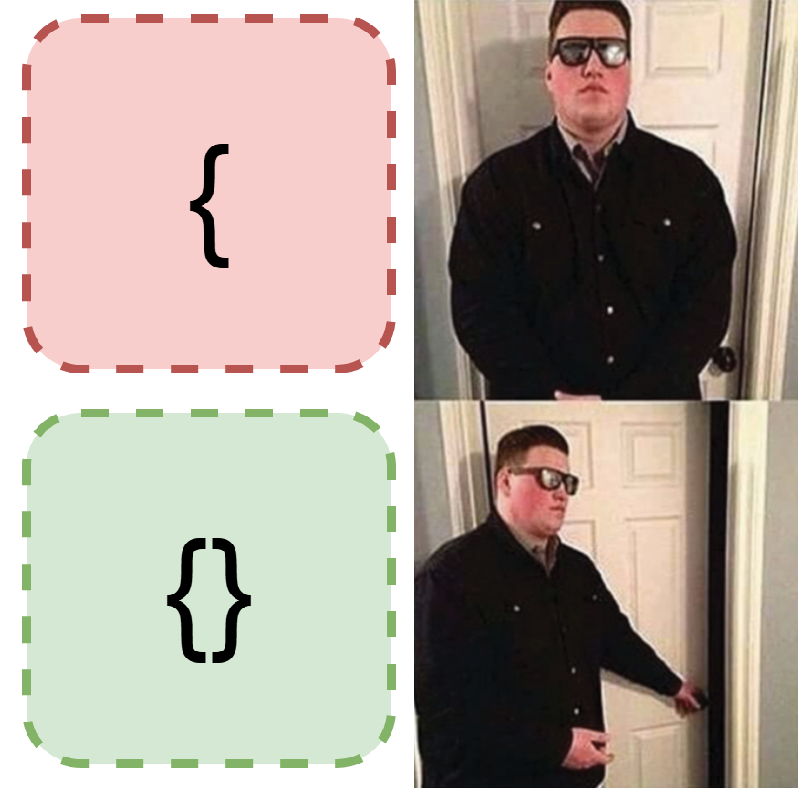
{}is a valid bit of JSON. Why? Because it conforms to the JSON syntax, it's an empty JSON object.{is not valid JSON. Why? Because it doesn't conform to the JSON syntax, it is missing a closing brace.
That's the long and short of it, if data matches the expected syntax it's syntactically valid.
The follow-on question is how can we check that a piece of data matches the expected syntax? That largely depends on the type of data you're trying to verify, for our JSON example you could use any of the following popular libraries:
- Python json
- Rust serde_json
- C++ nlohmann/json
There are some more universal ways of describing and therefore verifying syntax, such as ABNF schemas, I don't think we need to go over those!
Semantic verification
Another type of data verification is called semantic verification, which is about verifying the semantics of data. Semantics means the meaning of something, but what does that mean in the context of data? Again, lets go for an example to explain this, let's imagine we're dealing with data coming from a plane:
{
  "elevation": 200,
  "pitch": 1,
  "yaw": 10
}
In this example the plane might have some sensors recording this information, and might be sending the data to the black box or to ground control.
So what would make the example data above invalid semantically?
{
  "elevation": "cheese",
  "pitch": 1,
  "yaw": 10
}
Well this is clearly wrong, elevation can't be cheese. It's still valid JSON, it's just not valid plane data.
{
  "elevation": 200,
  "pitch": 1
}
This example might be wrong, it depends on whether yaw is a required field. Well who decides that? Whoever made the two systems this data is travelling between will have been in agreement on what data must be included and what it means. And how do they define this agreement? Typically, via a schema.
That's probably enough explaining for now, let's have a look at...
What are we going to import?
We're going to be importing PDFs through JSON, and then reconstructing the JSON back into a PDF on the trusted network.
The approach
The initial architecture is outlined below:
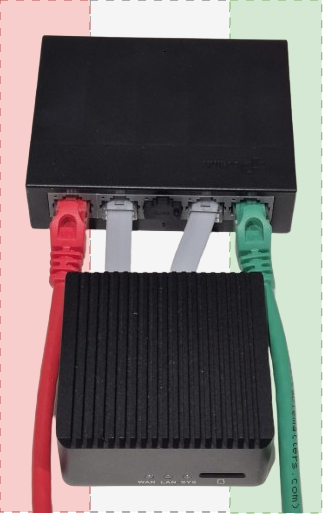
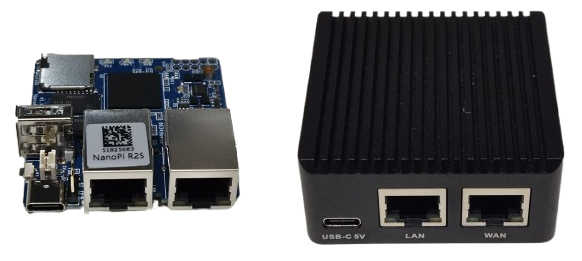
Comprised of two components our modified LS1005G and a new recruit, the NanoPi R2S.
1 - PDF to JSON
This is our transformation engine. We're going to do something simple to start with and only extract the text and the filename, to do this we're going to use pdfplumber.
$ python3 pdf_to_json.py example.pdf
{"filename": "example.pdf", "text": "this is the pdf text!"}
We can send then send the JSON content of the PDF over UDP at the ingress of the NanoPI R2S.
$ python3 pdf_to_json.py example.pdf | nc --udp 192.168.50.1 5005
2 - Protocol break receiver
Wait a second you say, shouldn't we have a protocol break sender first? You're right - however; we need to drop and ignore all of the protocol headers we don't care about here - UDP headers, IP headers and the Ethernet frame. How are we going to do that? Using raw sockets we can evaluate and completely ignore any protocol headers down to layer 2 where an attacker might look to exploit.
We can do this using any of:
- Python scapy or socket.SOCK_RAW
- Rust pnet or nix
- C++ yes
Here is a "dumb" example that just jumps past protocol headers and prints the payload.
import socket

ETHERNET_HEADER_LEN = 14
IP_HEADER_LEN = 20
UDP_HEADER_LEN = 8
PAYLOAD_OFFSET = ETHERNET_HEADER_LEN + IP_HEADER_LEN + UDP_HEADER_LEN

def start_raw_socket():
    try:
        socket = socket.socket(socket.AF_PACKET, socket.SOCK_RAW, socket.ntohs(0x0003))
    except PermissionError:
        return

    while True:
        raw_data, addr = socket.recvfrom(65535)

        if len(raw_data) > PAYLOAD_OFFSET:
            payload = raw_data[PAYLOAD_OFFSET:]
            if payload:
                print(f"{payload}")

if __name__ == "__main__":
    start_raw_socket()
3- JSON validation
Great we've not got the payload extracted from the raw packets and binned the other protocol information, we now need to do our syntactic and semantic validation. This is our verification engine. This is really the easiest bit due to sheer number of ways of handling JSON in most languages. For syntactic validation we simply attempt to parse the incoming JSON using:
- Python json
- Rust serde_json
- C++ nlohmann/json
For semantic validation we compare the parsed JSON against a JSON Schema using:
- Python jsonschema
- Rust jsonschema
- C++ json-schema-validator
An example JSON Schema for our PDF example might look as follows:
{
  "type": "object",
  "additionalProperties": false,
  "required": ["filename", "text"],
  "properties": {
    "filename": {
      "type": "string",
      "pattern": "^.+\\.pdf$",
      "maxLength": 255
    },
    "text": {
      "type": "string",
      "pattern": "^[\\x00-\\x7F]*$",
      "maxLength": 10000
    }
  }
}
This schema says for the JSON to be semantically valid:
- It must be an object
- It must only have the fields "filename" and "text"
- The "filename" field must have a value of type string, matching the regex and of max length 255
- The "text" field have a value of type string, matching the regex and of max length 10000
If you're thinking, well what if the library has a vulnerability? Good instinct! One way around that is design your own parser and make it handle as little context (aka 1 byte) as possible at a time, but ain't nobody got time for that. If you do have time for that, look at stuff like nom.
4- Protocol break sender
We've now got our syntactically and semantically valid JSON, now all we need to do is shove some UDP headers back on it and blast it at port 4. Again, plenty of options for sending UDP:
5 - JSON to PDF
Nearly there! Final step we now need to take our JSON containing PDF file name and text and spit out a PDF on the destination system. For this task we can use something like fpdf2.
Keep it simple stupid
The design above is built using a £10 network switch and a ~£40 NanoPI R2S. We could make the whole device a lot cheaper and more simple if we didn't need to use the NanoPI R2S. We do however need a device for our syntactic and semantic verification, as well as our protocol break. To cut the cost, what if we could use a device with a less powerful core and a single ethernet port? Enter the...
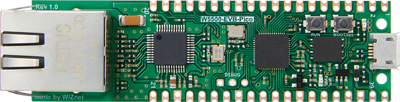
W5500-EVB-Pico
Only £10, but only one ethernet port. How would that work?
By configuring the switch to allow port 1 to only communicate with port 2, port 2 only to port 3 etc we end up with a daisy-chain of diodes.

Assuming each of the devices 1, 2, 3, 4 and 5 are on unique IPs we have a setup where a packet leaving device 1 can only reach device 2, a packet leaving device 2 can only reach device 3 etc. Now we only need a device with a single ethernet port to add new features in our daisy chain! This also means we can use up to 3 devices for validating, transforming or whatever we want. Let's see what the architecture looks like using a single W5500-EVB-Pico.

This is also a useful iteration in that it massively simplifies the complexity of the device, from a general-purpose Linux board in the NanoPi R2S to a microcontroller only handling a specific task we are reducing the surface area for exploitation.
Firmware
For the W5500-EVB-Pico firmware I used embassy and specifically embassy-net-wiznet. As previously discussed, I used raw sockets to receive datagrams directly off the wire and bin all the protocol information. As this device operates in a Rust no_std environment I needed to find an alternative to serde_json for syntactic validation of JSON. Lucky for me, there is a crate serde-json-core for this express purpose. Anyway, if you want you can check out all the source code for this part of the project here:
Conclusion
This is by no means a comprehensive implementation of this pattern, and there is several ways it could be improved, but it aims to explain and demonstrate the different stages of a high-assurance data import pattern. By binning protocol headers, enforcing strict schemas and segmenting networks with cheap data diodes we can build a robust defence against attackers importing malicious data and compromising our trusted network.
If you are interested in replicating this setup, adapting the firmware for different data types, or discussing how these patterns apply in fields like industrial IoT, feel free to reach out!
Future ideas
Whilst exploring the settings available in modifying the switch I found port mirroring as a configurable option per port. You can configure port mirroring per port for both RX and TX packets, as an example you could have all RX packets arriving at port 1 be mirrored from port 4. So how can we use this to make the process even safer?

1 - Transformation engine
As previously described.
2 - Mirror port 1 RX packets to port 4
Now we have the exact same packets arriving at both NanoPI R2S's.
3 + 4 - Separate network and JSON verification stacks
Each NanoPI R2S is running a separate network and JSON verification stack, one might be lwIP, one might be Linux for instance.
5 - AND check
If both verification stacks agreed that the packet was syntactically and semantically correct we allow that packet to pass.
Why?
With this pattern, we are making it significantly more complex for an attacker to exploit a vulnerability in one verification stack, as each packet is mirrored and passed through both stacks simultaneously.
Test doubles in Rust: mockall vs autospy

Unit testing is one of many tools in a software engineer's arsenal of validating their code does what they think it does. Unit testing aims to validate that an individual module, function or unit does what we expect in isolation.
To achieve in isolation it is a common scenario when writing unit tests to use test doubles to mimic interfaces without relying on a real implementation.
This is such a common scenario in fact that there are many crates that endeavour to simplify this process and reduce boilerplate, cumulatively racking up millions of downloads.
Popular test double crates
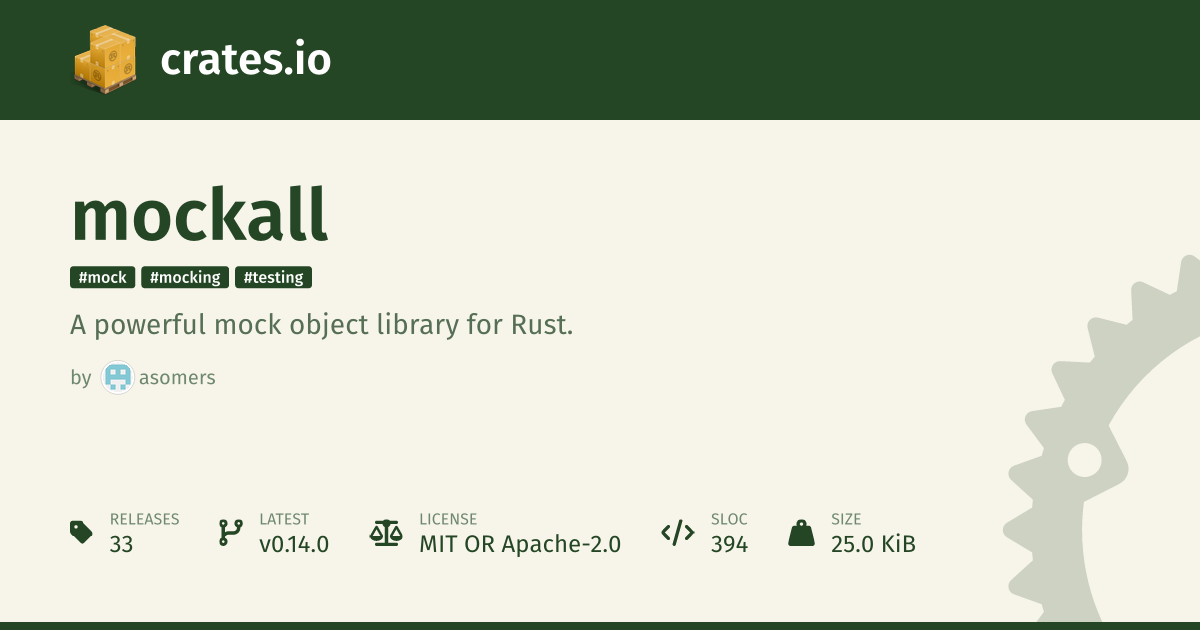 |  |
 |  |
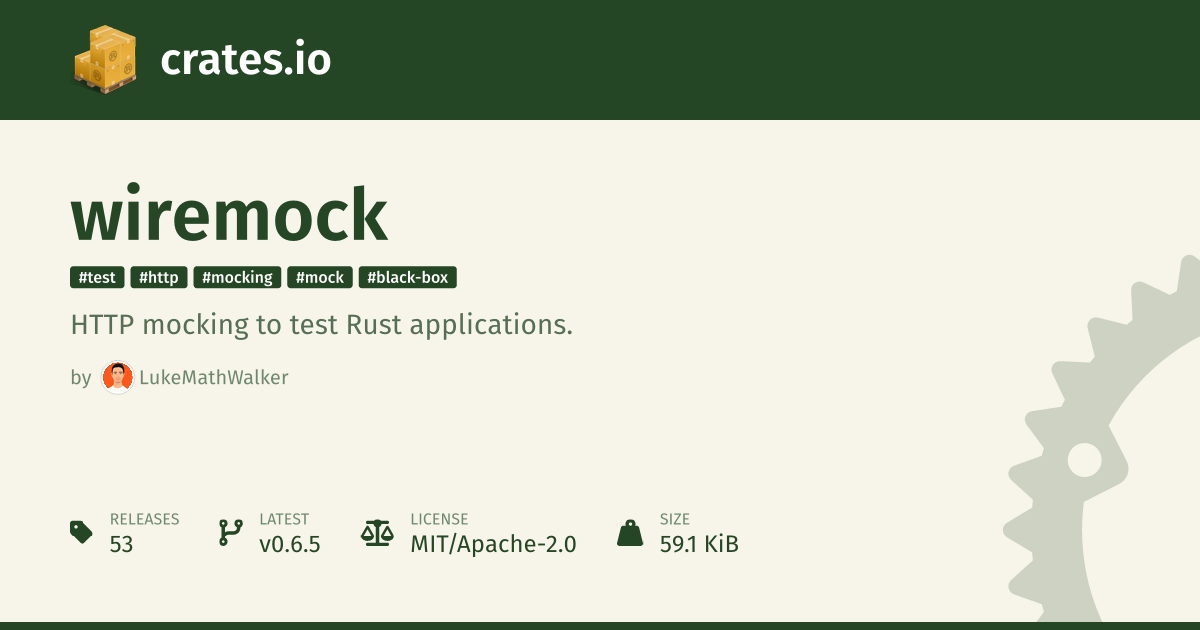
 |  |
Arrange, Act, Assert
One thing I noticed when moving from C++ to Rust, and is evident from the above list, is that mocks tend to be the preferred test double of choice in Rust. This was interesting revelation coming from other languages where the most common test doubles are typically fakes, stubs and spies.
You might be thinking, they're all test doubles does it really make that much of a difference? The answer is yes there are some obvious and not so obvious differences between mocks and other types of test doubles that I think should be taken into consideration.
Firstly, the "Arrange, Act, Assert" test structure I had become familiar with and is touted as "best practise" didn't seem to naturally fall out of tests that use mocks. It didn't feel like there was a clear divide between which part of the test was the arrange section and which was the assert.

Test structure is just one thing that differs between use of mocks and other test doubles. There are also some functional differences that will be covered later, to illustrate the "Arrange, Act, Assert" differences let's compare a typical test structure using mocks versus spies with some example code...
Mocks: typical test structure
- Configure the mock - this can include setting return values, specifying the expected arguments, defining call order or other expectations
- Inject and use the mock - then assert the function under test produces the expected result
- Panics during execution - if any of the expectations are violated, the mock will panic inside the function under test
#![allow(unused)]
fn main() {
#[cfg_attr(test, mockall::automock)]
trait SaveFile {
    fn save_file(&self, filename: &str, contents: &[u8]) -> anyhow::Result<()>;
}

fn save_file_to_disk(
    file_system: &impl SaveFile,
    filename: &str,
    contents: &[u8],
) -> anyhow::Result<()> {
    file_system.save_file(filename, contents)
}

#[cfg(test)]
mod tests {
    use super::*;
    use mockall::predicate::*;

    #[test]
    fn fails_to_save_file() {
        // Arrange & Assert ------------------------------------------------
        let mut mock = MockSaveFile::new();
        mock.expect_save_file()
            .with(eq("filename"), eq(b"contents".as_ref()))
            .times(1)
            .returning(|_, _| Err(anyhow::anyhow!("deliberate test error")));

        // Act -------------------------------------------------------------
        assert!(save_file_to_disk(&mock, "filename", b"contents").is_err());
    }
}
}
Spies: typical test structure
- Configure the spy - this usually involves setting the return values
- Inject and use the spy - then assert the function under test produces the expected result
- Verify arguments - assert the spy was called with the expected arguments
#![allow(unused)]
fn main() {
#[cfg_attr(test, autospy::autospy)]
trait SaveFile {
    fn save_file(&self, filename: &str, contents: &[u8]) -> anyhow::Result<()>;
}

fn save_file_to_disk(
    file_system: &impl SaveFile,
    filename: &str,
    contents: &[u8],
) -> anyhow::Result<()> {
    file_system.save_file(filename, contents)
}

#[cfg(test)]
mod tests {
    use super::*;

    #[test]
    fn fails_to_save_file() {
        // Arrange --------------------------------------------------------
        let spy = SaveFileSpy::default();
        spy.save_file
            .returns
            .set([Err(anyhow::anyhow!("deliberate test error"))]);

        // Act ------------------------------------------------------------
        assert!(save_file_to_disk(&spy, "filename", b"contents").is_err());

        // Assert ---------------------------------------------------------
        assert_eq!(
            [("filename".to_string(), b"contents".to_vec())],
            spy.save_file.arguments
        )
    }
}
}
Advantages of spies

Arrange, Act, Assert
As previously mentioned the "Arrange, Act, Assert" pattern is the expected pattern for unit tests, leading to improved readability when people drop in and out of a codebase.
Crate specific syntax
Something else of note is the reduction in crate specific syntax, in the mock example to express our expectations we needed to
use expect_fn(), with(), times() and returning(). These might read as obvious to a seasoned Rust veteran, or even
a standard mock user; however, there is a cognitive load in understanding what each of these do, and additional complexities
in the interface that would require a fresh pair of eyes to peruse the documentation.
In the spy example we can see this reduction in crate specific syntax, with the only crate specific function being set().
You might justifiable argue that returns and arguments are conceptually part of the library and therefore crate specific,
but in the lens of "Arrange, Act, Assert" they fall very clearly into one category or the other which results in the
test structure remaining consistent with unit test structures common in other languages.
Does not panic in function under test
One final difference which depending on the situation can manifest as an advantage is spies don't panic during the function under test if expectations are not met. Why is this relevant? First reason, it means you don't get the nice error messages you get with Rust's asserts. For example if we take the previous mock example, except whilst I'm writing it I make a mistake and misspell "filename" as "filenam", what happens?
#![allow(unused)]
fn main() {
#[test]
fn fails_to_save_file() {
    let mut mock = MockSaveFile::new();
    mock.expect_save_file()
        .with(eq("filenam"), eq(b"contents".as_ref()))
        .times(1)
        .returning(|_, _| Err(anyhow::anyhow!("deliberate test error")));

    assert!(save_file_to_disk(&mock, "filename", b"contents").is_err());
}
}
failures:

---- mock::tests::fails_to_save_file stdout ----

thread 'mock::tests::fails_to_save_file' (44145) panicked at src/mock.rs:1:18:
MockSaveFile::save_file("filename", [99, 111, 110, 116, 101, 110, 116, 115]): No matching expectation found
note: run with `RUST_BACKTRACE=1` environment variable to display a backtrace
Okay, we have "No matching expectation found", but which expectation? We have nothing to compare against, and no indicator as to which argument is causing the issue. That might not seem like a big issue here where we have two relatively simple arguments, but when we have multiple arguments, or the types become complex this quickly becomes non-ideal.
Let's compare to a spy:
#![allow(unused)]
fn main() {
#[test]
fn fails_to_save_file() {
    let spy = SaveFileSpy::default();
    spy.save_file
       .returns
       .set([Err(anyhow::anyhow!("deliberate test error"))]);

    assert!(save_file_to_disk(&spy, "filename", b"contents").is_err());

    assert_eq!(
        [("filenam".to_string(), b"contents".to_vec())],
        spy.save_file.arguments
    )
}
}
failures:

---- spy::tests::fails_to_save_file stdout ----

thread 'spy::tests::fails_to_save_file' (49891) panicked at src/spy.rs:45:9:
assertion `left == right` failed
  left: [("filenam", [99, 111, 110, 116, 101, 110, 116, 115])]
 right: [("filename", [99, 111, 110, 116, 101, 110, 116, 115])]
note: run with `RUST_BACKTRACE=1` environment variable to display a backtrace
Looks like any other Rust test assert message to me!
Advantages of mocks
It wouldn't be a fair comparison without looking at some of the advantages of mocks, as there are some benefits that might swing your choice.
Line count
This isn't always the case but mocks typically require fewer lines to achieve the same functionality.
Flexibility
As previously mentioned, mocks typically come with a lot more crate specific syntax:
- in_sequence
- never
- once
- return_const
- return_const_st
- return_once
- returning
- returning_st
- times
- with
- withf
- withf_st
Lots of bells and whistles, and therefore gives you as the author a bit more flexibility and levers at your disposal to implement the tests.
Conclusion
You might have read all of this (in which case thanks!) and thought well you made autospy, of course you're going to suggest people use it... to which I say I hope this article is somewhat convincing to give spies a try 😄!
These observations might just be from the lens of someone who has always used spies and fakes, and you might be perfectly happy to continue using mocks! Power to you, but if you ever find yourself one day looking to try an alternative which maybe you might enjoy more... autospy is always here!